Test |


|
Full Features |


Register Incidents
Register incidents via email, phone and web
Incidents can be registered in various ways:
Every time an incident is created, some incident template, predefined or chosen during incident registration, is used. |
 |
Create, edit and set incident templates
Each incident template has some predefined values set. You can set multiple incident templates to be used by members of a particular team and a particular account, and each team and account can have incident templates specific to their needs. Also, for example, you can set predefined values which will apply to:
|
 |
You can set values you often use to speed up manual incident registration. You can set which team or user a new incident will be assigned to, which service level will apply, any value can be set to be predefined. You can create as many incident templates as you need.

Integrate multiple email accounts with the help desk
Each team can have its own email account. For each email account you can set:
- incident template and contact template to be used when automatically converting emails to incidents and creating contacts,
- email automation mode to set what will exactly be done when emails are downloaded,
- POP3/IMAP settings for downloading emails, and SMTP for sending.

For example, you can set one email account for hardware support and another for software support, give them to different teams, and choose different incident templates for email-to-incident conversion such that created incidents are assigned to the team that uses this account, have specific service level chosen, etc.


Email automation modes of email-to-incident conversion
By choosing email automation mode for a particular email account you can set whether emails downloaded from that email account will be converted to incidents automatically or not, and whether a contact will be created if the email address is not in the help desk database. There are three possible email automation modes:
|
 |
Manage Incidents
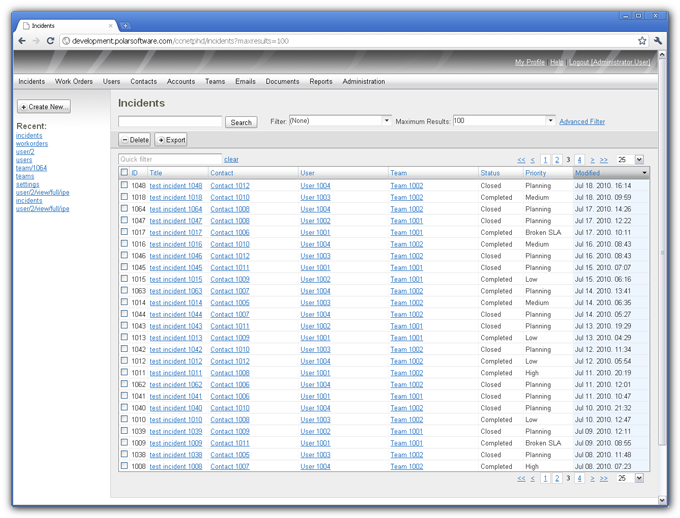
Track and manage incidents from the incidents desktop
All incidents can be monitored from the incidents desktop. It gives instant insight into incident statuses, priorities, assigned users and teams, contacts who reported them and time of their last modification. Incidents can be sorted, searched and filtered by text and by any other data they contain.

Search and filter by text, priority, status, user, contact, …
Incidents are searchable by text and by any other data incident can carry. Search engine will look for the keywords in incident titles and in complete incidents’ conversation history. You can also filter incidents by priority, status, contact who reported an incident, user or team an incident is assigned to, category, and any other incident data. Advanced filter lets you filter by many different type of data in once and save filters you often use.
Incident status and incident life-cycle
Status of a recently opened incident is by default set to New. Usually, when a user is assigned to an incident and starts working on it, he sets incident status to In Progress (if he needs more time), or responds and sets incident status to Waiting (if he is waiting for a response) or Resolved (if the contact needs to check whether problem is solved). When the contact who reported the incident responds, incident conversation is updated and incident status automatically set to New again. In the end, the user sets incident status to Completed or Closed.
Track time with accountable and non-accountable statuses
Time spent for resolving an incident is tracked: it flows only while the incident is in one of accountable statuses. New, In Progress and Resolved are accountable, and Waiting, Completed and Closed are non-accountable statuses. This data can be used in reports to track and manage quality of your support service. Also, the help desk monitors the amount of time an incident was in any of accountable statuses and, according to the service level chosen for that incident, escalates its priority automatically.
Incident priority automatically escalates in time
Incident priority escalates automatically, according to the service level chosen for an incident, and time that incident was in accountable status. Incident priority starts with Planning, and then escalates to Low, Medium, High, Critical and Broken SLA according to time intervals set in the service level chosen for that incident. Incident priority escalation helps you to make sure incidents are solved in time.
Work with Incidents
Incident conversation history and attachments
Complete conversation related to an incident can be followed easily. Each email sent and received updates conversation history automatically, and any picture or file sent in an email is attached to the incident the email is related to. Users and contacts can attach files by uploading them via user interface. Additionaly, every incident change can be viewed in incident history, it contains every state an incident was in since it was created and information about date and time it was modified and the user who modified it.
Incident origins, categories and closure classifications
You can choose how to categorize incidents by creating categories specific to your support service. Incident origins and closure classifications you use can also be created and modified. Lists of those will then appear in drop-down menus when editing an incident. All this incident specific data can be used when filtering incidents and saving public and private advanced filters.
Attach work orders to incidents
You can easily create tasks and assign them to teams and users. Each work order can be related to an underlying incident and assigned to a particular team and an individual user who is member of that team. For each work order you can track time, set deadline and view its full history. You can attach files to work orders and categorize them as you do with incidents.
Complete email integration
Complete conversation related to an incident can be done via help desk user interface integrated with multiple email accounts. The help desk automatically sends text a user entered in the resolution field as email and saves it in conversation history. When a contact replies, the help desk downloads email and updates incident conversation. Every incident change can also be communicated by setting it in email notification settings for each team. For example, you can choose to notify particular users and contacts when incident status has changed to New, when priority has changed to High or Critical, when incident conversation is updated, etc.
Let contacts log in and engage
Each contact can log in to the help desk and report incidents by himself, view incidents he reported and their status and conversation history any time. You can give additional permission to a particular contact or to all members of a particular account if you want to provide more data or permit additional actions to them. By default, contacts can view their incidents, filters they created and saved and personal data but, for example, you can additionally give permission to some of them to view and edit documents to have a wiki-like knowledge base, view incidents reported by any member of their account, anything that can be done via user interface can be allowed to any user and contact if needed.
Customize Email Notifications
Set notification rules by event and by team
Each team can have its own email notification settings: a set of notification rules and choices of email templates, as well as its own email account. Notifications can be sent on any incident event possible: new incident registration, incident status change and priority escalation, incident conversation update, reassignment of a user or a team. When setting the notifications, you can fine-tune who will receive notification on certain incident event and what will be communicated.
Fine-tune notification events and destinations
You can choose to notify any person related to an incident such as: the user assigned to the incident, members of his team, the contact who reported the incident. For every incident event, you can choose different destinations. For example, you could choose to notify the user an incident is assigned to on any priority escalation, but when priority escalates to High, Critical or Broken SLA to notify also every member of his team.
Choose email templates by event and by team
You can choose what will be communicated through email notifications by setting and modifying email templates. You can create as many email templates as you need, and choose for each team in email notification settings which template will be used on incident creation and which on incident status, priority or other change.
Edit email templates using scripting language
Email templates are completely customizable using simple scripting language. You can, by using string variables, choose to put incident conversation, incident status, priority and other data into email text automatically generated by the help desk and sent to destinations set in email notification settings.
Manage Users and Teams
Organize users and teams
Each incident is assigned to a particular team, and can be later assigned to a named user who is a member of that team. For each team a particular email account can be set, email notification settings chosen and particular templates given. Each team can provide team specific permission to its members to create, view, edit and delete resources such as incidents, documents, contacts and any other data in the help desk database.
Multiple email accounts and team notification settings
Each Team can have its own email account and email notification rules. You can choose for each team who will be notified on a specific incident event by choosing its email notification rules, and what will be communicated in emails by choosing email templates. Also, by setting incident and contact template for the email account of a particular team, you can choose predefined values an incident and a contact will have when automatically created from an email downloaded from that email account.
Fine-tune types of teams with roles and permissions
Each team is in at least one role. Role is a set of permissions to create, view, modify and delete resources, and users are granted permission to view or do anything according to roles their team is in. In this way, you can create many types of teams, and have many types of users. Every action that can be done via user interface can be permitted or not: you can completely fine-tune who can create, view, edit and delete any specific data you have.
Manage Contacts and Accounts
Organize contacts and accounts
Each incident is reported by a contact, a member of some account. Each account can have multiple service level agreements set, one for each service, which then apply to all incidents opened by its members according to service incident is requesting. Each account can have its own roles and permissions, for example, members of one account can be given access and right to edit knowledge base, or anything else you find fitting.
Manage Service Level Agreements for each account
You can set which service level will apply to incidents requesting a particular service and reported by a member of a particular account by setting Service Level Agreements for that account. Service level is a set of rules: you can set working hours and holidays, and fine-tune time intervals for escalating incident priority.
Give more access to contacts with roles and permissions
Contacts can be given access and permission to anything you find fitting, there is no difference between what can be allowed to contacts and what to users. Each contact is granted permission to create, view, modify and delete resources according to roles his account is in. You can fine-tune permissions in this way and build many types of contacts and accounts, as you can with users and teams. Everything that can be done via help desk user interface can be allowed or not.
Manage Service Level Agreements
Define services and service levels
You can set different services, each incident is a request for a particular service. Each incident has also a choice of a particular service level. You can fine-tune during which hours the time will be tracked, and how fast support department should respond and solve an incident.
Set working hours and automatic escalation time intervals
By creating and modifying service levels, for each service level you set:
- operational hours: this allows you to set working hours, time to resolve an incident will be tracked only during those hours
- working days and annual holidays
- time interval for each priority: when an incident reaches escalation time for a particular priority, its priority is automatically increased
Time for resolving and incident is tracked only while the incident is in one of accountable statuses.
Offer many different Service Level Agreements
Each Service Level Agreement is a choice of a service level for a particular service. Service levels can be fine-tuned so that you can offer many different support options to your customers. Once you set Service Level Agreements for a particular account, you are sure that for every incident reported by a member of that account the time is tracked, and priority is escalated, notifications sent and incident solved on time.
Integration with Existing User Accounts
Active Directory integration
You can import your users from the Active Directory. You are able to import Active Directory users as Contacts or Users and synchronize the data of already imported users. Once you import your accounts from the Active Directory the help desk will be able to detect your user profile and you will be logged automatically using NTLM. You can read more at How to Configure Active Directory Integration.
Import user accounts from a file
If you have user accounts stored in a file you can easily import them to the help desk database. Import procedure also allows you to map and customize the data from your file while it is being imported to the database.
JSON RESTful Web API
Integrate any system with the help desk
API enables you to integrate any application with the help desk, including web applications. It allows you to connect to the help desk using HTTP protocols and perform any task you could perform via user interface. Everything that can be done via user interface is and can be simply done using one of four HTTP methods on URI resources you see in URL address bar.
RESTful design and JSON representations
Four HTTP methods (POST, GET, PUT and DELETE) provide simplicity of use and design. Resources are modelled using JSON, a very simple and efficient way of representing data structure. Abundance comes from plethora of different URI resources and their hierarchy. RESTful design provides statelessness, cacheability, client-server uniform interface and layered systems.
Develop in the language of your choice
HTTP methods are supported by any of the popular programming languages, including C#, Java, PHP, Python, .NET, Perl, and Ruby. Each method carries a specific action: POST creates a new resource, GET fetches a resource for viewing, PUT modifies a resource and DELETE deletes it. It is all you need to interact with the help desk via user interface or via some other system you have. List of all URI resources and available HTTP methods in Polar Help Desk 5 can be found on our wiki help page at URI Resources and HTTP Methods.
Stateless, cacheable, client-server uniform interface
Programmable web is user friendly as well as machine friendly. Help desk users can jump to different pages just by intuitively changing URI, bookmark a page to get the same resource every time they open it, modify query parameters — URIs have simple syntax on their own. You can browse the help desk as administrator via web browser and get an instant insight into how API works by visiting our development demo.
Reports
Real time reports
Manage your support service by monitoring and analyzing support processes by using various reports: contacts by registered incidents, registered incidents over time, user activity, incidents by status, completed incidents over time, etc. The reports are rendered immediately, giving the real time results. You can also analyse history data to plan your resources and improve further help desk support achievements.
Use charts to manage your support processes
Chart is generated for each report. By choosing a time period, you can isolate a particular time frame for reporting. By using trend charts, you can forecast the changes on your help desk support, notice disfunctionalities and improve your help desk and staff performance. You can also edit any of these reports if needed.
Build your own reports
You can build custom reports via help desk interface using server side and client side JavaScript. Permissions to edit and create reports can be fine-tuned. This possibility allows you to customize reporting completely to the finest detail if needed.
Customize and Use Multiple Languages
Easily edit any label in a language
Every label visible in user interface can be edited easily. You simply go to Administration > Languages, click on a particular language, edit that label and click save. In that way, you can fine-tune language you use easily via help desk user interface.
Build your own language easily
You can easily build any language you need by editing labels via user interface. You can also import and export languages in different file types. All those languages can be used at the same time by different help desk users.
Let each user and contact choose his language
Global default language is set in the help desk settings. Each team and account can choose other language for their members if needed, and additionally, each person can choose his/her preferred language. Hierarchy of language choices and easy label editing makes your help desk a multi-language web application with complete language-customization.
|
|
